Showing posts with label <£2Dinners. Show all posts

Tuesday, 2 June 2020

Carrot and Hazelnut Roast

Something for our continued series of Using Up Carrots.  Following on from the Carrot & Lentil Soup I made last month, one of the dishes I  planned to make with our mutants was the Carrot & Hazelnut Roast from Rose Elliott’s Cheap and Easy vegetarian cookbook.  Sadly, Lidl aren’t stocking hazelnuts, so I tried it with cashews and, you know what? It tastes even better.  This recipe doubles up well and copes if you need to vary the size/number of carrots or can’t get a large enough packet of nuts.  Serve with roast potatoes and peas or, in hot weather like today, cold with a green salad.  It’s delicious either way.

Price-wise, this should work out at less than £2 for one loaf.

Carrot & Nut Roast - serves 4

Ingredients
2 large carrots, sliced
1 onion, peeled and roughly chopped
2-3 slices bread, torn into strips
100g-200g hazelnuts or Cashew Nuts
2 teaspooons mixed herbs
2 eggs
1 tablespoon soy sauce

Method
  1. Preheat the oven to 180C.
  2. Place the hazelnuts, carrots, onion and bread into the food processor, hold it securely and process until chopped.  (It’ll bounce around a bit.) 
  3. Add the remaining ingredients and process until combined.  You want a grainy texture, not completely smooth.
  4. Spoon into a lined loaf pan and bake for 50-60 minutes, or until the middle feels firm to touch and it is browned on top.  
  5. Turn out of the pan, peel off the lining and cut into 4 to serve.

Note:  If you’re making roast potatoes to accompany this, parboil them for 15 minutes, baste with oil and put them in the oven at the same time as the roast.


Enjoy!

Pam

Tuesday, 19 May 2020

Recipe Tuesday: Corn Pone (or what to do with leftover chilli)

Sunday, we had beef chilli for dinner.  When I cooked it, I followed the chilli variant of my recipe post from May 2007,  Minced Beef & Other Possibilities, adding grated carrots and a quarter cup of split red lentils to ensure we had leftovers.  There was enough chilli for dinner for two, two lunch boxes and to form the basis of dinner tonight.  

The idea behind this recipe comes from The Tightwad Gazette, where Amy Dacycyn talks about adding a tin of baked beans and a cornbread top to leftover chilli, in order to make Corn Pone.  Sadly, Amy doesn’t give more details. Maybe Americans are taught to make cornbread at school.  I certainly wasn’t.  The top is a Cornmeal Spoon Bread.  I haven’t priced up the leftover chilli but the additions come to 62p.

Corn Pone - Serves 4

Ingredients

2-4 portions of beef chilli
1x 420g can baked beans (22p)
150g/1 cup fine cornmeal (15p)
1 teaspoon baking powder (5p)
1 clove garlic, crushed (optional) (5p)
1 teaspoon lazy chilli (optional) (5p)
1 egg, beaten (10p)
250ml/1 cup water
Pinch of salt
5 grounds black pepper

Method
  1. Preheat the oven to 220C.
  2. Combine the chilli and the baked beans and pour into a deep ovenproof dish.  Smooth over the top.
  3. In a bowl, combine the other ingredients and beat until smooth.  (This is the spoon bread top.)
  4. Pour the spoon bread over the over the chilli, carefully covering the top of the chilli.  (It will be runny and won’t pour out smoothly.)
  5. Bake in the preheated oven for 30-40 minutes, or until browned and crisp on top.

Try as I might, I couldn’t get it to look pretty on the plate, but it was yummy!


Enjoy.

- Pam

Thursday, 30 April 2020

Carrot & Red Lentil Soup

Last year, we grew a small bed of carrots.  Beyond unearthing a couple, which were decidedly green  - the green bits are safe to eat but taste like eating carrot tops - we didn’t get around to unearthing more until earlier this month.  OMG, I have never seen so many deformed carrots!


They’re multi-coloured, which surprised us, until we found the label.  Turned out that we planted a rainbow packet of purple, yellow and white carrots as well as the traditional orange.   How anybody grows straight carrots is beyond me.  These were planted in a new, raised bed, which was filled with fresh compost, and they still turned out looking like mutants!  Seriously, this one looks like he’s got a lizard’s head.


Today, I turned some of the larger mutants into soup for lunch.  Four of them, including the beast above   This is inspired by a recipe from Leites Culinaria., (I just utilised their spicing.)


Ingredients

1-2 tablespoons oil
1 onion, peeled and roughly chopped
1 large clove garlic, crushed
1 tablespoon grated ginger
4 large carrots, peeled and sliced
1 cup/200g split red lentils
2 litres boiling water
2 chicken stock cubes
1 teaspoon ground coriander
1 teaspoon ground cumin
Salt and pepper to taste


Method
  1. Heat the oil in a large saucepan and gently fry the onion, garlic and ginger until the onion is soft.
  2. Stir in the coriander and cumin and fry until the aroma rises.
  3. Pour over the boiling water.  Add all the remaining ingredients and simmer for 20 minutes or until the carrot and lentils are soft.
  4. Blend in the saucepan with an electric stick blender. 
  5. Check the seasoning and serve with fresh bread.
Enjoy!


- Pam (As you can see from the photo above, I like my soups to have a bit of texture.)  

Wednesday, 22 April 2020

Sophie Dahl’s Dhal

I am so going to reek of garlic tomorrow!  Dinner tonight was a sweet potato dhal that involved an awful lot of sliced garlic fried in garum marsala.  The first time I made it, the garlic turned out surprisingly nutty; tonight, not so much.  Oops!

This recipe comes from the BBC television series, The Delicious Miss Dahl, broadcast in 2010.  I think I only caught one episode and, in it, Sophie Dahl talked about working in Bollywood and then went on to make this recipe as an example of the food she lived on while in India.  When it was published on the BBC website, it was called “Sophie’s dhal with lemon and saffron spiced rice” and included instructions to make your own garum marsala. The BBC only had rights to publish the recipe for a year, or I’d link to it here.  This is my version.  I have never actually made the lemon and saffron spiced rice; I usually just serve it with plain rice, made using the rice trick.  Tonight, I made it with bulgar wheat instead of rice, using the same quantities and method.

This was costed on the cheapest versions of the ingredients that I could find on the Tesco website.  I have allowed 10p for the oil and 10p for ground spices and bay leaves.  It works out at £2.94 for 8 generous servings, which is cheap enough that I’m going to tag it with <£2Dinners.

Sophie Dahl’s Dhal - serves 8

Ingredients

Sweet potato
500g sweet potatoes, peeled and cut into rough wedges (55p)
3 tablespoons oil

Tarka
2 tablespoons oil
1 large onion, sliced (20p)
3 garlic cloves, thinly sliced (5p)
1 red chilli, sliced (10p)
2 teaspoons garum marsala
2 inch piece fresh root ginger, peeled & chopped/grated (19p)

Dhal
500g split red lentils (90p)
1.5 litres boiling water
1/8 teaspoon ground asafoetida
1/8 teaspoon ground turmeric
2 bay leaves
2 large handfuls spinach (30p)

Rice
2 cups Basmati rice (30p)
4 cups boiling water

Method

  1. Place the oil for the sweet potato into a roasting dish.  Place in the oven and preheat the oven to 200C.
  2. Place your chopped sweet potatoes in a saucepan, cover with boiling water, bring back to the boil and simmer for 10 minutes or until soft.
  3. When the sweet potato has finished simmering, drain well.  Remove the baking dish from the oven and carefully toss the sweet potato in the hot oil, until as much as possible is coated.  Try to get each wedge of sweet potato standing separately in the baking dish.  Grind over salt and pepper.  Bake in the oven for 20 minutes or until crispy.
  4. Meanwhile, place your lentils in a larger pot, cover with 1.5 litres of boiling water, add the asafoetida, turmeric and bay leaves.  Bring back to the boil, turn down to a simmer and simmer for 15-20 minutes or until almost all the water is absorbed and the dhal is soft.
  5. Once you have put your sweet potato in the oven, do your rice, reusing the saucepan.  Combine your rice with double the quantity of boiling water, cover, bring back to the boil and boil for 2 minutes.  Turn off and let sit for at least 15 minutes or until all the water is absorbed and the rice cooked.  
  6. At the same time, make your tarka.  Heat 2 tablespoons of oil in a frying pan and gently fry the onion until soft.  Stir in the garlic, ginger, chilli and garum marsala and fry for another 3-5 minutes or until soft, stirring continuously or your spices may burn.  Remove from heat and leave until the lentils and sweet potato are cooked.
  7. When everything is cooked, stir the spinach, tarka, and sweet potato into the lentils and serve with the rice.


- Pam

Tuesday, 21 April 2020

Warm French Lentil Salad

Today’s recipe is a frugal favourite that I discovered on a trip to Paris in July 2007.  DH’s cousin lived near the Trocadero and had organised a surprise birthday party for her mum  at a restaurant near the Jardin Du Palais Royal.  I wish I could remember its name.  The restaurant was beautiful inside, very Belle Époque, and the food was delicious.  The service was lovely, too (they treated DH’s mum and aunt like queens).  My choice for starter was a warm lentil salad, which they made with small, black, Puy lentils and the type of anchovy that is marinated in vinegar or lemon juice not salted.   

This is my version.  On occasion, I’ve added smoked mackerel instead of anchovies but it also works well with shavings of a strongly flavoured, air-cured ham.   In the version in the photograph, I used leftover roast duck.  The fish (or meat) just adds an extra flavour dimension but isn’t essential - ou can leave it out completely and I have excluded it in my costings.   The red pepper adds crunch and sweetness;  you could use a yellow one instead.   (I have seen a version of this recipe that uses thinly sliced radish.)   It goes well when served on a bed of baby spinach leaves or watercress.

Quantities given feed four as a main course.

Warm French Lentil Salad. (£1.50 excluding optional fish/meat)

Ingredients

2 cups small black lentils. (50p)
3 spring onions, sliced. (30p)
1 sweet red pepper, sliced into 1-2 inch strips. (32p)
4 tablespoons extra-virgin olive oil  (20p)
2 tablespoons white wine vinegar (or sherry vinegar or white balsamic vinegar). (10p)
1 tablespoon Dijon mustard  (10p)

Optional:  125g (approximately) marinated anchovies, drained, or smoked mackerel or shavings of air-dried ham (e.g. pancetta)

Method

  1. If you have time, soak your lentils for an hour first.  Then drain well and deposit in a mid-sized saucepan.  Cover with boiling water, bring back to the boil and simmer for 15 minutes until soft.  (If you forget or don’t have time to soak the lentils, you will need to simmer for 30-40 minutes.)
  2. Meanwhile make your vinaigrette, combine the olive oil and the white wine vinegar in a blender, add the Dijon mustard and process until smooth.
  3. When the lentils are cooked, drain them well and decant them into your salad bowl.
  4. While still hot, pour over the vinaigrette.
  5. Now prepare your vegetables and grill your mackerel (if using), shredding it into lumps once cooked and crispy.
  6. Stir the pepper, spring onions and fish into the warm lentils, then serve.


Enjoy!  We had it for dinner last weekend.

- Pam

Friday, 10 April 2020

Mexican Pilchard Pudding

Hi.  How are you?  Are you well?  It’s amazing how many emails I have sent or received that include “I hope you are well” in either the opening paragraph or in the sign off.  “We’re fine”, I respond, “Still healthy.”  So far, I know a handful of people who have had Covid-19, including a couple of colleagues on my project, who had been working together in the south-west, just before their symptoms started nearly three weeks ago.  They’re recovering well.

Are you able to work?  DH has been working from home (“WFH”) for four weeks now, while I’d been going into the office to work with a visiting Australian colleague (aka “the Stray Australian”) until Boris announced the Lockdown on Monday 16th March, at which point the office officially closed.  The Stray Australian flew back to Oz on March 19th and is now working in his evenings, while I'm starting an hour earlier than usual so that our days overlap.  The only other difference is that, instead of sharing one big screen and sitting on opposite sides of a 2 metre wide boardroom table for 8 hours a day, we’re spending half the day talking and screen sharing via MS Teams.  He signs off at about noon, UK time, leaving me with a list of tasks to complete in the afternoon. Most days, that’s fine but I think I hit a low point yesterday afternoon, when I completely lost my mojo after trying - and failing - to make a report work for me.

The weather changed last weekend.  We went from bitterly cold and rather damp to hot and sunny, in the space of 24 hours.  Until that point, going for a daily walk was an unwelcome necessity to burn off calories and expand the lungs.  “I wish we had a dog,” I grumbled to DH one day, “then at least somebody in this household would be enthusiastic about going out for a walk!”  Today, we walked for an hour and saw, maybe, 20 people doing the same thing.  There’s an odd dance that people do now when you encounter them walking, “Are you going to cross to the other side of the road, or shall I?”, before one or the other crosses over.

Today’s recipe is brought to you via the back garden, where we are sitting in the sun while listening to the radio.  It originated in a Mexican cookbook published by Sainsbury’s, 30-odd years ago.  I have no idea where my copy is - I just went looking for it - so I can’t tell you the author.  Anyway, this is a store-cupboard recipe, that I made the other night for the first time in years, having internalised the recipe back in the 1990’s.  Coatings are based on the prices in Lidl.  If you don’t have pilchards, you can used a can of mackerel in tomato sauce instead. 

Mexican Pilchard Pudding - serves 4 - cost £1.50

Use an 8-10 inch (20-25cm) oven proof casserole or soufflé dish, something that is at least 4 inches/10cm deep.

Ingredients

500g potatoes, mashed (see step 1 below). - 25p
1x450g can Pilchards in Tomato Sauce - £1.10
1 egg, beaten - 10p
1 teaspoon baking powder - 5p

Method

  1. If you don’t have mashed potatoes to hand, boil the kettle.  Meanwhile, peel, wash and trim 500-600g potatoes.  Cut into 5mm thick slices and layer into a saucepan.  Cover with boiling water, place the pan onto a high heat and bring back to the boil.  Turn down to a simmer, add a pinch of salt and then simmer for 15-20 minutes or until soft.  Place a jug in the sink and pour the potato water into that as you drain the potatoes.  Mash the potatoes, adding the potato water as necessary until you have a light but dry mash.
  2. Preheat the oven to 180C.
  3. Meanwhile, tip the tin of pilchards into your baking dish and mash with a fork.
  4. Sprinkle over the baking powder and beat in the egg.
  5. Finally, fold in the mashed potatoes.  Smooth over the top and bake for 45 minutes.
  6. Serve with a green vegetable for contrast, either broccoli or garden peas.


Enjoy!

- Pip

Saturday, 28 March 2020

Pizza!

Over the years, I think that I may have mentioned our annual attempt at growing tomatoes.  We don’t grow a lot, just two or three plants.  Last year, we had a bumper crop so I made several tubs of tomato sauce and shoved them in the freezer.  We used one tub last weekend over pasta, and it was lush!  It was so tasty that I immediately started planning to make pizza for dinner on Friday night.  Since my pizza recipe is straightforward, I thought I’d share it with you.

At it’s most basic, this recipe produces two “Neapolitan Pizzas” of dough + sauce + mozzarella for £1.80 and feeds 4.  It takes 3 hours.

Start with the dough.  This comes from an edition of Self magazine, that I purchased in (probably) 1992.   It is so simple that it didn’t take me long to internalise the recipe.  I have made this hundreds of times.   Please read the notes at the bottom before proceeding.

Pizza Dough - makes 2, 12-inch pizzas (approximate cost 20p)

Ingredients

2.5 cups of flour (yes, two and a half measuring cups)
1 cup tap water
1 sachet or two teaspoons of easy bake yeast
1 teaspoon olive oil (can be left out)
2 pizza trays (or see note 5 below)

Method

  1. Hand method:  Take off your rings.  Place your flour into a large bowl.  Scatter over the yeast, then make a well in the centre and pour in the water.  Coat your hands with the olive oil, allowing the excess to drip into the mixture.  Using your fingers, fold the flour into the water.  Continue until you have a smooth dough.
  2. Food processor method:  combine all the ingredients in the bowl of the food processor and process until a ball of dough is formed.  Turn the dough out into a large bowl.
  3. Both methods:  if the dough is too sticky at this point, kneed in a little extra flour.  If too dry, kneed in a tablespoon or two more water.
  4. Drape a clean tea towel over the bowl, and place it somewhere warm to rise for an hour.  While waiting, make your tomato sauce.
  5. Take off your rings.  Using your hands, knock back the dough.  (Give it a good thump, then kneed for a minute or two.). Cover and leave in a warm place for another hour.
  6. Knock back your dough again then divide it into two halves.  Form each half into a ball. 
  7. Scatter flour over your work surface and rub into your rolling pin.  Place the first ball of dough into the centre of your work surface and roll it out until it is a) circular, and b) fits your pizza tray.  Carefully lift it onto your pizza tray.  Repeat with the other ball.
  8. At this point, put your oven on to preheat at 240C.  Allow the dough to rise for a further 20 minutes, before covering with toppings.  Meanwhile, prepare your toppings.
  9.  Top your pizzas and bake at 240C for 10-12 minutes.  Serve.

Notes:-

  1. You might have noticed, that I keep telling you to take off your rings.  Yeast dough can be incredibly sticky and hard to remove from your hands.  You don’t want it caught up in your rings.  If you do get coated in dough, soak your hands in water and wash well until the damn stuff comes off.  Don’t be tempted to wipe if off on a towel, because it’ll harden to cement.  (I learnt this the hard way.)
  2. To help stop the dough sticking to you hands, drizzle a small amount of olive oil into the palm of one hand and rub over both palms and your fingers.  They will be greasy.
  3. Only baking for one or two?  The dough freezes well.  At the end of step 6, lightly grease the inside of a freezer bag, drop in one of the balls of dough and freeze.  Remember to label the bag first.
  4. No rolling pin?  Use an empty wine bottle or any similar shaped, tall, round, glass bottle.  Remove the label first.
  5. No pizza tray?  Or only one?  You could use a flat cookie tray and form a lip around the edge of your pizza, to keep the toppings inside.  Alternatively, if you only have one tray, you could leave the second half to rise again as a ball of dough, while the first one is cooking, but that will mean a two-part meal.
Now for the sauce.  This is based on one from Delia Smith (aka St Delia of the Kitchen) but it’s not in the book that I thought it came from.  The flour is to stop it separating and to help thicken it.  (Tomato sauces have a tendency to separate and split.). It freezes well.

Tomato Sauce (approximate cost 65p)

Ingredients

1 onion, finely chopped (10p)
1-2 cloves garlic, crushed (5p)
2x400g cans chopped tomatoes (or the equivalent of home grown). (50p)
1 heaped teaspoon of flour
1 teaspoon dried basil
I-2 teaspoons muscovardo sugar
Possible splash lemon juice or vinegar
1 tablespoon oil

Method

  1. In a decent sized saucepan, heat the oil over a low heat and gently fry the onion until it turns clear and glassy.  Stir in the garlic and fry for a minute or two longer.
  2. Scatter over the flour.  Stir well to ensure everything is covered.
  3. Pour in both tins of tomatoes, stirring continuously and bring to the boil. Turn down to a simmer and stir in the basil and one teaspoon of sugar.  
  4. Simmer until very thick. (This may take 20-30 minutes.) 
  5. Taste the sauce.  Is it too sweet?  Or too sour?  If too sweet, stir in a splash of lemon juice (from a bottle).  If too sour, stir in the second teaspoon of sugar.
  6. Allow to cool before spreading thinly on your pizza base.
Note: you may have sauce left over.  Don’t be tempted to pour it onto the pizzas - it will make for a watery, soggy pizza and your toppings will slide off.


Suggested Toppings

Scatter any combination of the following over your pizza:-

2 x Mozzarella balls, grated  (90p)
100g cheddar, grated (34p) - add to the mozzarella
1 can anchovies, drained (70p)
Sliced pepperoni or salami or chorizo or ham
Thinly sliced mushrooms and/or peppers
Thinly sliced olives
Leftover oven roasted sliced veg (peppers, mushrooms, onions)

Once, baked, the results should look like this.  


Yum!!

- Pam

Monday, 23 March 2020

On with the Motley

Today is a special anniversary.  20 years ago, today, I joined the discussion boards of The Motley Fool.  The Fool has played quite a big part in making me who I am today: tech savvy; an investor; a knitter again (I’d given up in the ‘90’s).  I’ve made friends through it; discovered new places; learned how other people live and how other countries operate (tax, politics, etc).  The members of the Fool taught me to budget and how to put the “living” into Living Below Your Means (aka LBYM).  Their posts gave me a window into their lives, before Blogs became a thing and long before Facebook.  For all of that, I say “thank you”.  Yes, I am a Fool and so are they.

All of the above brings me to what I want to say today.  I think that we’re witnessing the start of the next Great Depression and we will need the wise counsel of the Fools more than ever.  No, it’s not because the stock market has crashed (the FTSE100 is down over 2,000 points).   It will be the unintentional consequence of The Big Shutdown that we’re experiencing in Europe:  everyone working from home who can;  flights cancelled;  schools closed;  hotels, pubs, clubs and restaurants shut;  shops closing their doors and hoping that their online business will keep them afloat.  All concerts and live performances have been cancelled.  So many lives are already disrupted and it will just get worse.  The British Government has stepped up for regular employees - if you are furloughed, you will get 80% of your regular salary*, paid for by a government grant - but if you are a zero hours employee or self-employed, as I write you are only entitled to the most basic of benefits (£92/week).

In all this, my thoughts turn to what we can do to help. I worry about how bad it will get and how many people will suffer.  I’ve already fundraised for the local soup kitchen and the food bank**, but I want to do more.   Since I am a Fool and a cook, I have decided that I will create a collection of recipes of really cheap meals, based on four principles:-

  1. Tasty
  2. Filling
  3. Nutritious
  4. Less than £2 for an entire meal

They will be posted here on the Blog, since it’s free to access, and possibly compiled into a PDF.  That will be my big task for 2020. 

- Pam


* There is an upper limit in the £2,500/month.

** How is it that, in the 21st century, people are relying on soup kitchens and food banks, institutions which disappeared during the majority of the 20th century.

Tuesday, 10 October 2017

Slow Cooker Cuban Black Beans

We were introduced to Cuban-style black beans by The Lost American.  It's classic peasant food:  slow cooking cheap meat (smoked ham hock) with dried beans, to feed as many as possible.  Ham hock is hard to find here, so generally speaking I use bacon off-cuts aka "cooking bacon" which I can buy for 60p for 500g.  Once or twice, I've used lumps of ham.  When I have found ham hock, it was sold from the hot-meat counter at the supermarket for several Pounds each.

This is one of those meals which you suddenly find yourself craving.  I think that's down to its smokey flavour.  The only downside to cooking it in a slow cooker/crockpot is that everything comes out a dark brown  colour.  Please read the notes section before you proceed. 

The cost is between £2 and £3 depending on how much bacon you use and assuming 10p for the cheapest herbs and spices.  This makes at least 5 portions of soupy stew, more if you serve it over rice.

Ingredients

500g black turtle beans, soaked overnight and drained (£1.10)
1 onion chopped (12p)
6 cloves garlic, crushed (10p)
2 green peppers, roughly cubed (40p)
150g-500g  cooking bacon, roughly chopped (or use leftover ham, see notes below) (18p-60p)
2 chilies, chopped (or 1 heaped teaspoon ground chilli)
1 smoked dried pepper (if you are lucky enough to find them) (say 50p)
1 bay leaf 
1 tablespoon oregano 
1 tablespoon ground cumin
2 tablespoons white vinegar
1/2 teaspooon liquid smoke (2p)
Boiling water to cover

Method

  1. Combine all the ingredients in the slow cooker.  Ensure that there is at least a 2.5cm (1 inch) covering of boiling water, more if your slow cooker lid doesn’t seal well.
  2. Put the lid on, set the cooker to high and cook for a minimum of 8 hours.  
  3. If it gets a bit dry, add more boiling water (cold water will cause the pot to crack).
  4. If it turns out soupy, serve with lots of fresh bread.  Otherwise, serve over rice.


See what I mean by brown?

Notes:-

  • Slow cookers/crockpots are meant to have well-fitting lids that seal so you need less liquid.  I’m on my third and, as far as I’m concerned, that’s a bit of a myth.  The original crockpot has a rubber gasket around the lid and that does seal.  For all the others, you’re dependent upon how well the lid fits the rim.  My current one has certainly boiled dry.  
  • You need to cook this on high for the beans to go soft.  (It should be possible to mush them with a spoon.)  The first time I cooked this, I used  “automatic”, which starts off as high and then swaps to low after 2 hours.  We got home 12 hours after it started cooking and the beans were still hard.
  • I can only find black beans, aka black turtle beans, in Waitrose.
  • Where do you get the Liquid Smoke?  Ocado sell a 148ml bottle of Stubbs Liquid Smoke for £1.89, so I based the cost on that.  My bottle is years old.

- Pam

Tuesday, 6 June 2017

Recipe Tuesday: Not quite Mr Julian's Dhal

There are a thousand recipes for dhal.  I like dhal.  For me, it's an ideal comfort food: tasty, filling, healthy/nutritious, cheap and kind to my irritable-bowel-syndrome-gallbladder-free-long-suffering gut.  

To me, the smell of yellow dhal cooking is the smell of the Middle East.   In 2012, when we were visiting Oman, we dropped in on my brother-in-law for lunch and "Mr Julian", the chef in the officers' mess fed us yellow dhal and roti for lunch.  It's what BIL and his colleagues ate every day.  I begged "Mr Julian" for his recipe, which he kindly and bemusedly wrote down for me.    He seemed quite taken aback that I would want something that simple but we explained that it was something most Brits didn't know how to cook.  (Incidentally, I am using parentheses because I'm fairly certain that "Mr Julian" isn't his real name, but instead is an anglicanisation.  I think he was Bangladeshi.)

When I got back to the UK, I attempted to make Mr Julian's Dhal.  The first stumbling block was that he'd written "curry powder" on the spice list, which left me mystified until BIL explained it was Garam Marsala.  (I don't use commercial curry powder and didn't have a clue what blends are available in Oman.) Once that mystery was solved, I made a couple of batches then added the recipe to that precious pile of paper and plastic where all loose recipes ended up, on the corner of the bookcase in the old, pre-renovated kitchen. 

 A few months ago, I thought I'd have another go.  I really fancied eating dhal for lunch.  Sadly, I hunted high and low and couldn't find the precious slip of paper with the recipe.  I went through the cookbooks; it wasn't tucked inside.  I tried a couple of recipes from the Curry Club cookbooks but they weren't the same (one required so many whole peppercorns that even my spice tolerant stomach complained).  In the end, I resorted to the recipe that was on the back of the Natco Chana Dal packet, adding garam marsala and veg at salient points and hoping for an approximation of Mr Julian's Dhal.  I remember his boiled the dhal with turmeric and a tablespoon of garam marsala, but I can't remember what other spices he used, if any.  This, though, was nearly as good and I made a pot of it for my lunches for work this week:-

(Almost) Mr Julian's Dhal

Makes 7 portions.  Total cost £1.97, assuming 5p for the cost of the bulk-bought spices


Ingredients

300g yellow split peas/Chana dhal. (67.5p)

1tsp turmeric

1tblsp garam marsala

1/2 tsp salt

Boiling water


The Tarka

1 tbsp. oil (3p)

1 onion sliced (12p)

100-150g mushrooms, sliced (25p)

1 large clove garlic, crushed (5p)

1 tsp ground chilli 

2 cups frozen mixed veg (30p)

1 x 400g can chopped tomatoes (25p)

Optional:  A handful of fresh spinach leaves or leftover rocket from a bag of salad leaves. (25p)

Optional:  a tblsp or so of fresh coriander leaves, chopped 


The Rice

1.5 cups basmati rice (12p)

3 cups boiling water


Method


1.       Pour the dhal into a sieve and rinse well in fresh water.  It doesn't need soaking..

2.       Boil the kettle.  Meanwhile, measure the dhal in a jug, make a note of the volume measurement and pour into a saucepan.  Add twice as much boiling water.  (The packet said to use 1 litre of water for 300g of dhal but that took considerable simmering to be absorbed..)

3.       Stir in the turmeric, salt and the garam marsala, bring back to the boil and simmer until the dhal is soft and most of the liquid is absorbed.  Stir regularly.   The dhal will be cooked after 20-25 minutes but it takes a while until the liquid is almost gone.  (Note:  when it reaches the point where it starts to stick to the bottom of the pan, that’s when it’s ready.)

4.       Meanwhile, make your Tarka:

a.       Heat the oil in a frying pan and fry the onion until soft. 

b.      Add the mushrooms and continue frying until most of the water they make has evaporated.  Then stir in the crushed garlic.

c.       Have your frozen mixed veg ready on the side.    Sprinkle the chilli over the contents of your frying pan and stir fry until the aroma rises.  Stir in the frozen veg and fry until all their water has evaporated.

d.      Add the tomatoes and fry until most of their liquid is gone, stirring occasionally.  Stir in the spinach and coriander if using and cook until wilted.  Switch off until the dhal is ready.

5.       To make the rice using the absorption method:-

a.       Boil the kettle again.

b.      Measure out your rice and put in a saucepan with a tight fitting lid.

c.       Cover with twice as much boiling water.

d.      Bring back to the boil and boil for 2 minutes.  (Use a timer.)

e.      Switch off the heat.  Cover the saucepan with its lid and leave to sit for at least 12 minutes.

f.        It is now ready to serve.

6.       When your dhal is ready, stir in the tarka.  Taste and season as necessary.  Serve over rice.


Notes:

  • As you can see from the photo, this is great for lunch boxes for work.  It freezes well.  Defrost and then zap for 2 minutes in the microwave or until piping hot.
  • Instead of using frozen mixed veg, you can use any leftover cooked vegetables you have to hand.  This works well with grilled peppers or roasted mix veg (e.g. Sliced onions, mushrooms, peppers, courgettes tossed in oil and herbs and roasted for half an hour or so in a hot oven).
 

Tuesday, 23 May 2017

Recipe Tuesday: Pilchard Madras

In case you've never come across the term before, "pilchard" is the Cornish name for a large sardine.  In Britain, while fresh sardines are sold as "sardines", "pilchards" are sold canned, usually in a tomato sauce but sometimes in brine.  Like regular cans of sardines - the small flat tins you can buy the world over -  the taste and smell is quite strongly fishy.  Despite this, they're a useful storecupboard item.  They're sold in 14oz/400g tins, currently for £1.09 each.   One can should feed four.

I like to cook them in a Madras curry, which mitigates the fishy flavour.  The original was made in a moment of pure inspiration, several years ago, and now I make it once in the blue moon, when I haven't preplanned dinner and fancy a curry.  That was the case a couple of weeks ago, so I thought I'd share the recipe with you.

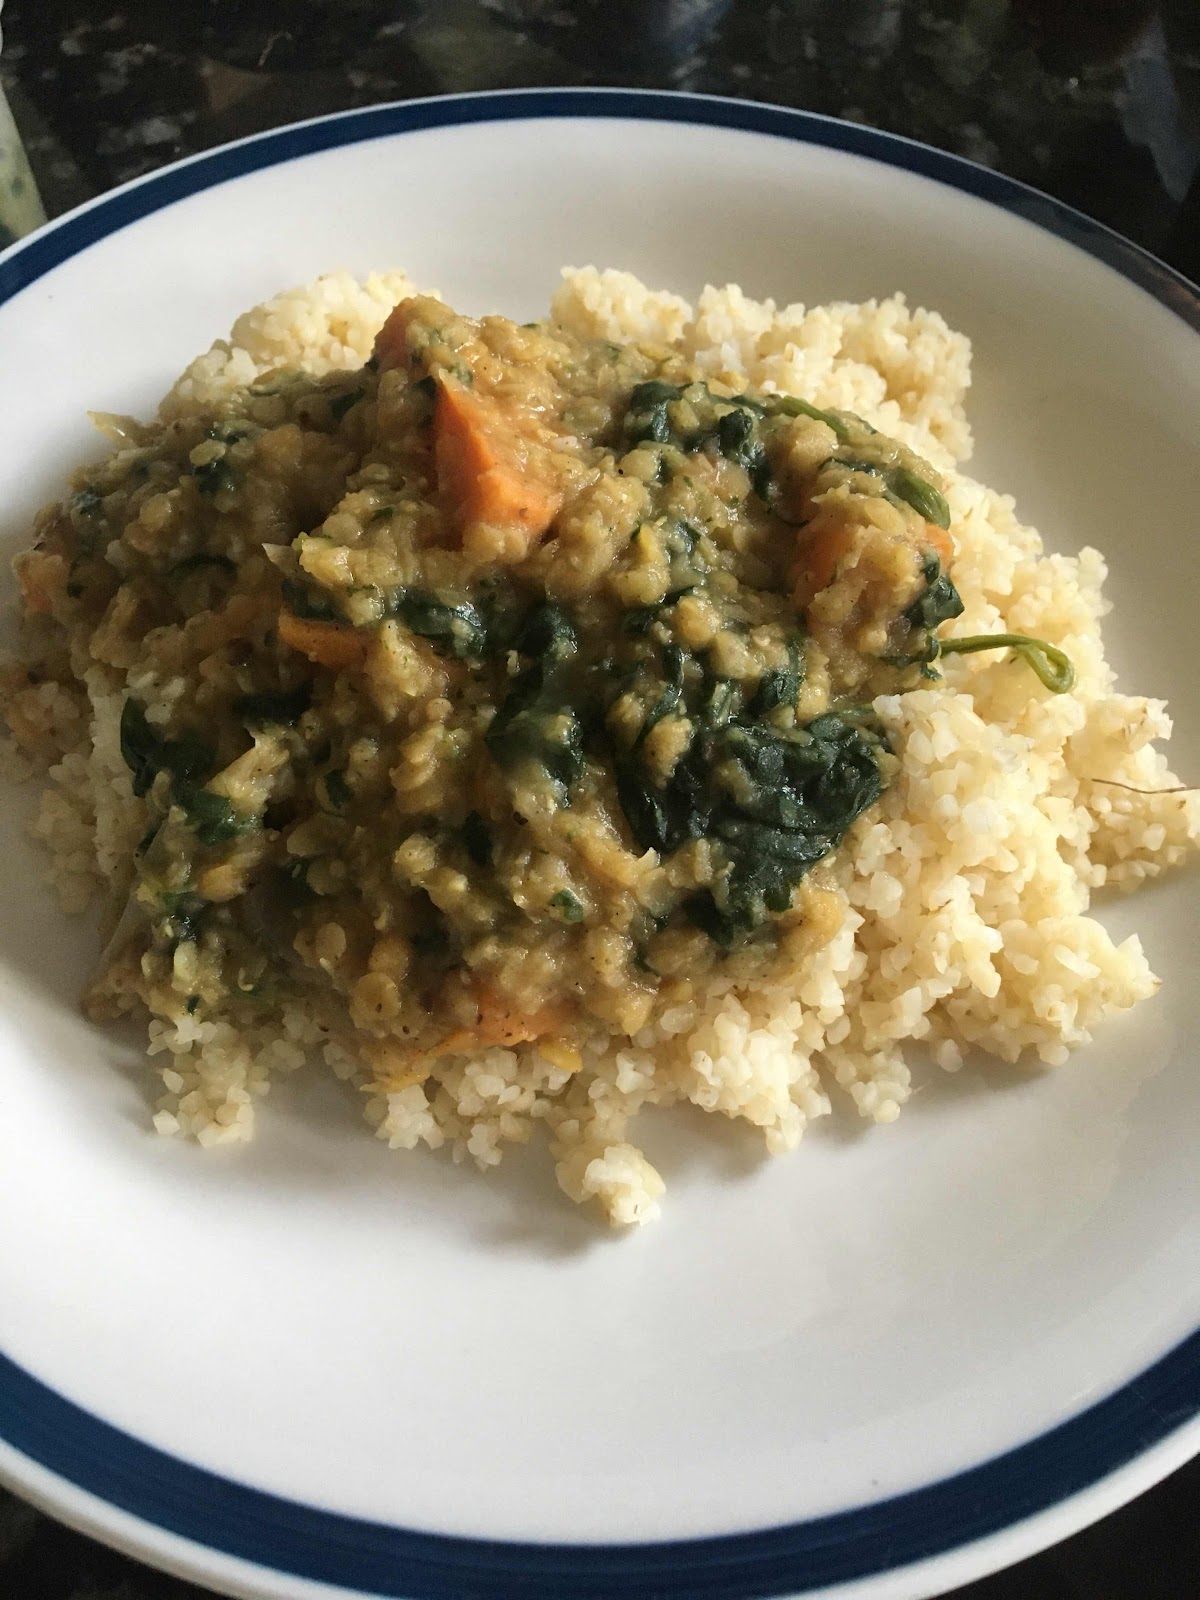
Like all my curries, it's a one pot meal, padded with veggies (in this case, the last of the carrots which were half dead in the fridge).  Just add rice (which I have done, below).  For instructions on cooking a "regular" meat Madras, see the notes below the recipe.


Pilchard Madras

Makes 4 generous portions.  Total cost, including rice, £2.41.

Ingredients
1 large onion, chopped (12p)
1-2 cloves of garlic, crushed (5p)
100g-200g  mushrooms, sliced. (35p)
(Or, instead of the above, use a portion of base)
1x400g tin Pilchards in tomato sauce. (£1.09) 
1x400g tin chopped tomatoes (25p)
Additional veg:  e.g. 2-3 large carrots sliced or 1-2 peppers/capsicum, cubed, or a cup of frozen mixed veg (whatever is available) (15p)
1-2 tablespoons vegetable oil (I use rapeseed). (3p)
2 tablespoons lemon or lime juice (from a bottle). (5p)

Spices 1 (20p)
1 teaspoon ground chilli (more if you like heat)
1/2 teaspoon ground black pepper
1 teaspoon ground cumin
1 teaspoon ground fenugreek
1 teaspoon ground turmeric
2 whole green cardamom

Spices 2  
1 desertspoon garam marsala
1 desertspoon chopped fenugreek leaves (optional)

Rice
1.5 cups basmati rice or white, long grain rice (12p)
3 cups Boiling water

Method
  1. Combine spices 1 in a small ramekin dish.  Add a tablespoon or two of water to form a thick paste and set aside.  (This will help stop the spices burning.)
  2. Heat your oil in a deep saucepan or large, deep frying pan.  Fry the onion until soft and glassy, stirring occasionally.  Add the mushrooms and, when they have made water and most of their water has evaporated, add the crushed garlic.  Continue frying for 1-2 more minutes.
  3. Make sure you have your tins of tomatoes and pilchards open.  Stir Spice 1 into the onion mix and fry until the aroma rises. 
  4. Quickly add your tins of tomatoes and pilchards, breaking up the pilchards with your wooden spoon/spatula as they land in the pan.  Stir in well.
  5. Add your optional veggies.  Bring to the boil, stirring all the time, then turn down to a simmer.  Stir occasionally.
  6. At this point, put the kettle on to boil for the rice.  When the kettle has boiled, measure out your rice and pour it into a saucepan with a tight-fitting lid.  Cover the rice with twice the volume of boiling water.  Bring the saucepan back to the boil, cover with the lid and boil for 2 minutes.  Switch off the power and leave it to situndisturbed for 15 minutes, or until the rice is cooked and all the water is absorbed.
  7. Immediately after you have switched off the rice, stir Spices 2 into your curry.  Simmer until the rice is done, stir in the lemon or lime juice and  serve.

Notes:-
  • To cook a regular meat Madras, add a step between step 1 and step 1 above. Heat 1 tablespoon of oil/cooking fat and brown 1lb/500g of cubed beef/lamb/chicken/pork.  Remove the browned meat to a plate, then proceed with steps 2, 3 and 4, returning the meat to the pan at step 4.  In step 5, simmer the meat mixture for an hour or until it is cooked and can be cut with a fork, stirring occasionally and adding extra water if it gets too dry.  Once the meat is tender, proceed with the remainder of the recipe  
  • I buy my spices in 500g bags from the Asian section of the supermarket or from Asian shops like Wing Yip and store them in old Douwe Egberts coffee jars. This is the cheapest way to buy them. Given how long they last, etc, I reckon 20p is a fair assessment of the cost of all the spices listed.
  • When you are feeling flush, buy big bunches of fresh fenugreek and coriander.  Wash them, chop them and freeze them loosely packed into the largest ziplock bags you can find. (You want to be able to break up the herbs when frozen.).  When you need fresh herbs to finish off a curry, add a spoonful/lump or two straight from the freezer. 
  • All the prices above are based on the cheapest option from Tesco.  Yes, you can get tins of chopped tomatoes for 25p, but only when they're on a 4 for £1 offer, when I usually stock up.

Tuesday, 18 April 2017

Recipe Tuesday: Bread and Cheese Pudding

One of the websites I frequent is MoneySavingExpert.  A couple of weeks ago, their weekly newsletter had a give-away/competition:  win a copy of somebody's new cookbook full of £1 meals.  Sounds great!  Just the sort of cookbook that I'd enjoy reading and stealing ideas from.  Until I read the small print on the blurb at the back of the book....  Each portion of food costs £1.  Then I saw red.

Let me spell it out to you.  Since your average recipe makes four portions of a meal, that means each recipe actually cost £4.  Not £1.

It was a book of £4 dinners, not £1 dinners.  On the basis of this book, any fool can make a beef chilli, using supermarket standard ingredients and have spent less than £1 per portion.  Hell, I can do it using beef from my (expensive) Kosher butcher and have cash left over.  Talk about misleading marketing!  Some poor person, who is struggling to make ends meet, will buy that book based on the title and the fact that it was mentioned in MSE's newsletter.  Instead of getting something that will actually help them save money, they'll just get a cookbook full of all the recipes that don't involve roast dinners.

So in the spirt of "beat them at their own game", I have decided to publish a series of very cheap-to-cook recipes, tagging them as <£2dinners.   Here is the first.  The cost of each item is in brackets after its listing. All items are supermarket cheapest, "value" own-brand.

Bread and Cheese Pudding.

Serves 4.  Total cost £1.89

Ingredients

Four slices of bread, cut in half diagonally (5p)
325g can sweet corn kernels, drained (35p)
200g can tuna, drained (65p)
2 eggs (12p each = 24p)
250ml milk (25p)
75g mature cheddar cheese, grated (35p)

Method

  1. Preheat oven to 200C.
  2. Layer the bread, tuna and sweet corn  in a lasagne dish, so that the bread points stick up and each slice of bread has some tuna and corn between it and the next one.
  3. Scatter over the grated cheese.
  4. In a measuring jug, combine the eggs and the milk and whisk until well combined.  Add a grind or two of black pepper.
  5. Pour the egg mixture over the bread.
  6. Bake for 30-40 minutes, or until the cheese is melted and the egg mixture has set.

Yummy!


(As an aside, Blogger's reluctance to update their App is really beginning to wind me up.   I'm writing this on my iPad, via the web browser.  Uploading the photo for today's post was a nightmare.)