Showing posts with label cheese. Show all posts

Tuesday, 10 September 2024

Recipe Tuesday - Baked Feta & Tomato Pasta

There is nothing like the taste of a freshly ripened, home grown, cherry tomato.   This year, we’re having a bumper harvest of them.  Fortuitously, someone mentioned an internet craze for baked feta and tomato pasta.  After a couple of sessions testing other people’s recipes, this is my version.  It feeds 4.

Ingredients

500g punnet of Cherry Tomatoes (or the largest you can get), washed
200g block Feta Cheese (get the proper Greek stuff, made with sheep/goat milk)
2 cloves garlic, crushed
80g jar salted anchovies in olive oil (or use a tin.  Don’t drain it.)
1/3 cup extra virgin olive oil (the good stuff)
360g dried pasta


Method

  1. Preheat the oven to 220C.
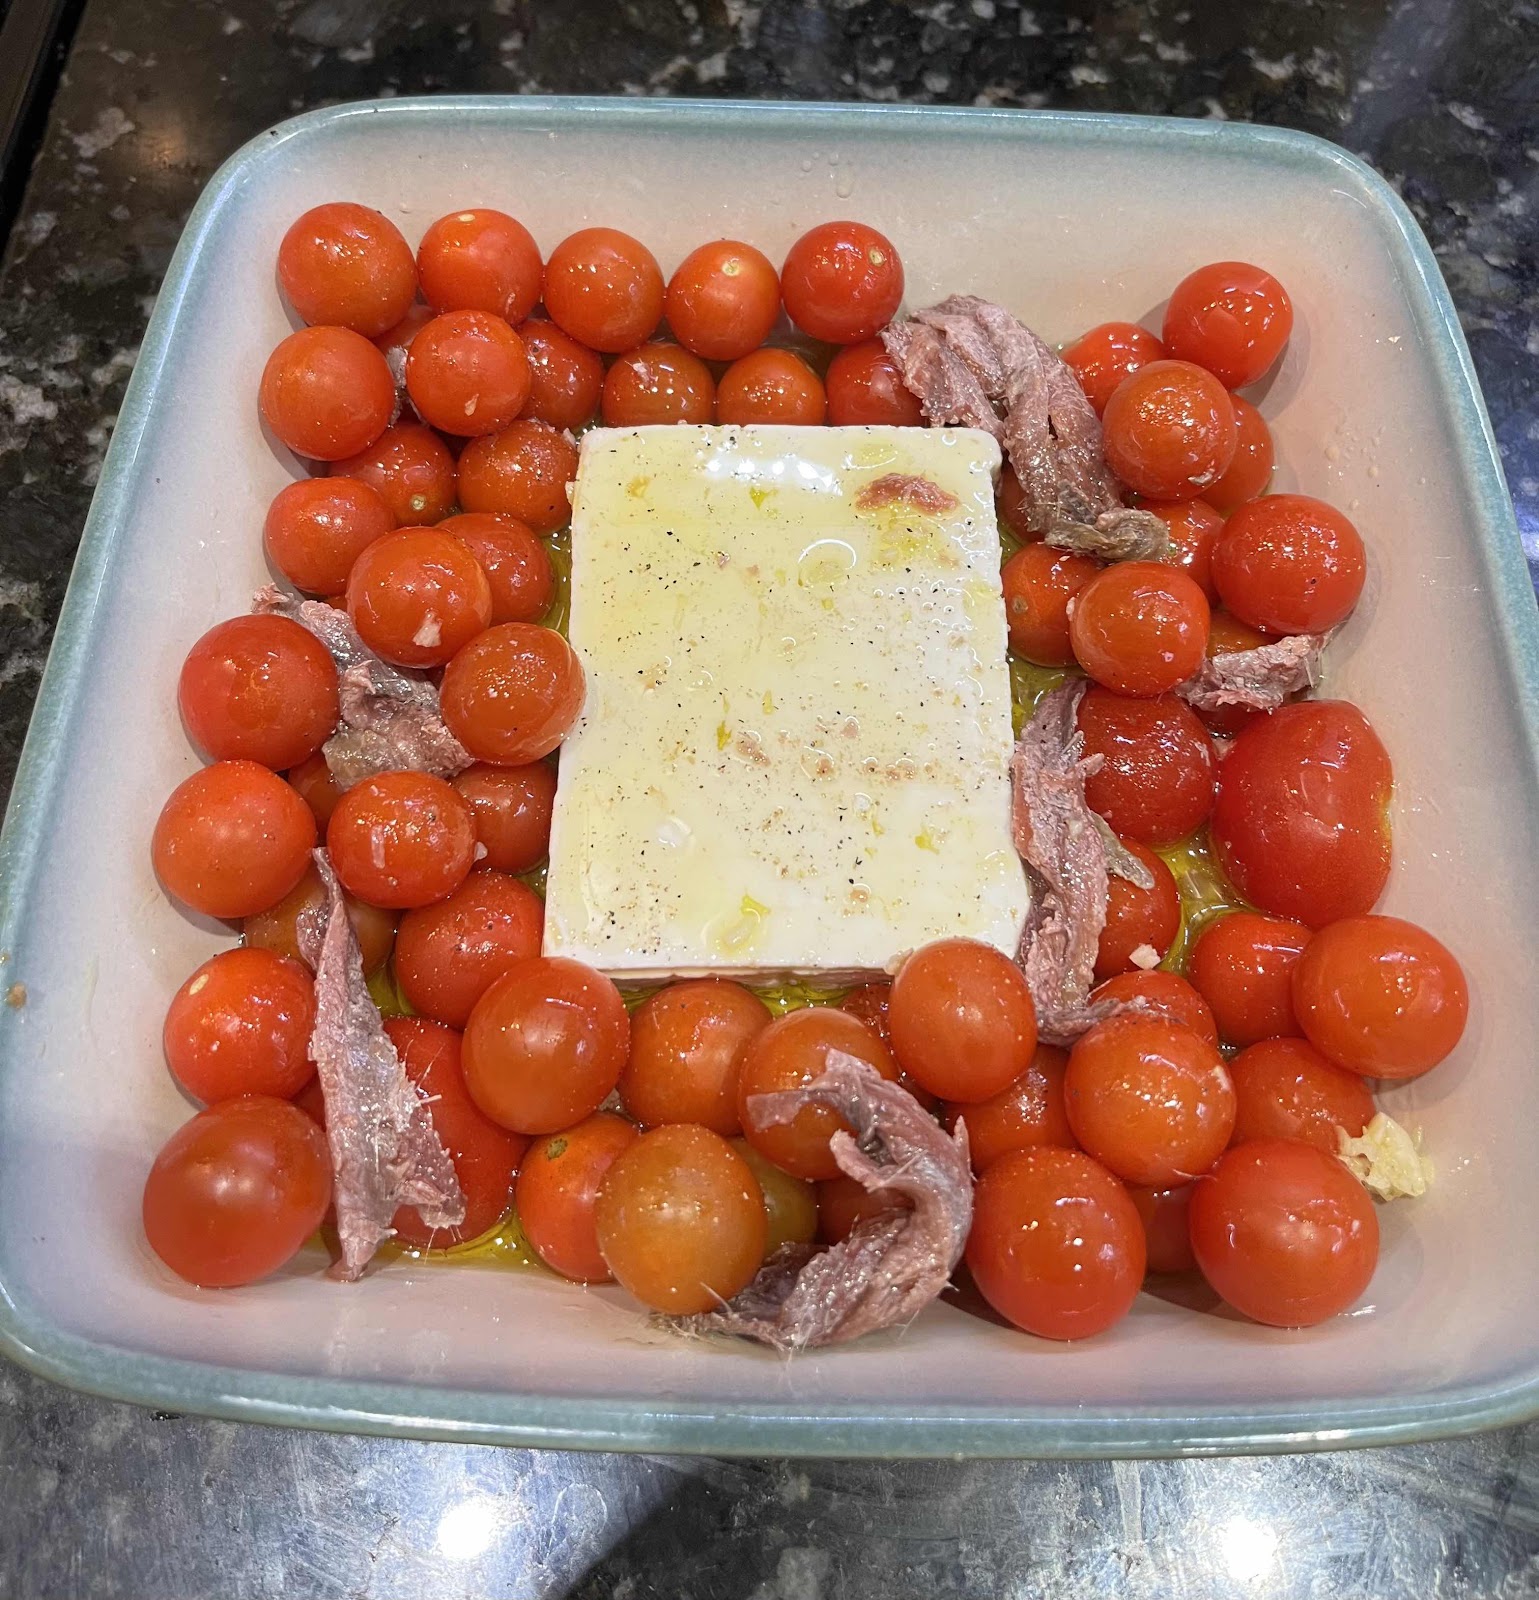
  2. Put the Feta into a lasagne dish, arrange the cherry tomatoes around it, together with the garlic.  Pour over the olive oil, attempting to coat as many of the cherry tomatoes as possible.
  3. Turn the Feta over, twice, to coat with olive oil.
  4. Dot the anchovies around the dish and pour the jar’s oil over the contents of the dish.


  5. Bake at 220C for 45 minutes.
  6. Meanwhile, at the 30 minute mark, boil a large kettle or two of water, pour it into your largest saucepan and bring the water back to the boil..  Add a pinch of salt, then pour in the dried pasta.  Bring back to the boil again, turn down and simmer for the amount of time specified on the packet.  (In my case, 11 minutes.). Once cooked, drain and return the pasta to the saucepan.
  7. After 45 minutes in the oven, the tomatoes should be cooked and the Feta browned.

     
  8. Remove the lasagna dish from the oven, and mash the contents together.  Stir into the drained pasta and serve.
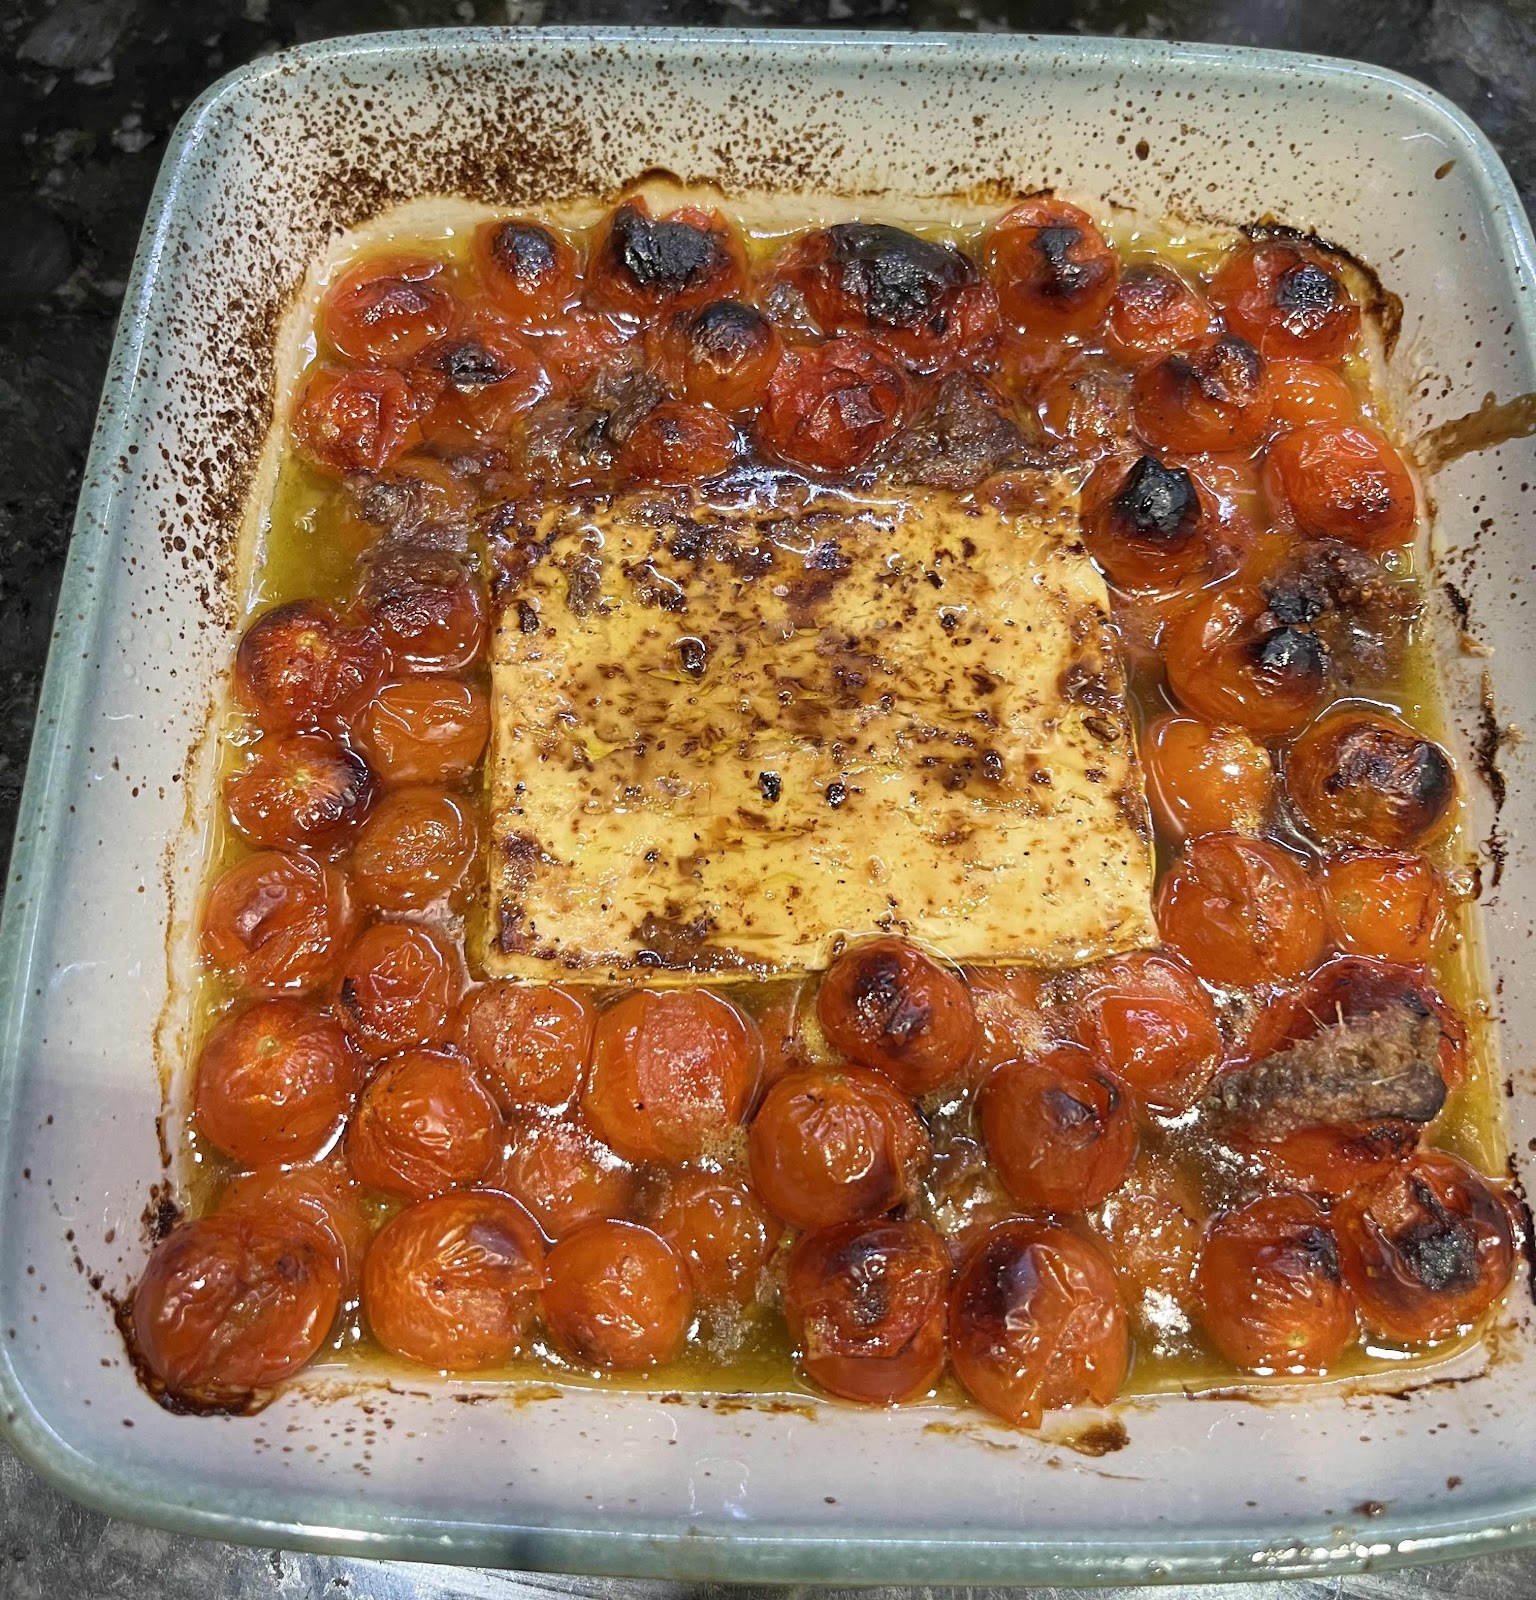
It isn’t pretty but, OMG, is it tasty!


- Pam

Saturday, 28 March 2020

Pizza!

Over the years, I think that I may have mentioned our annual attempt at growing tomatoes.  We don’t grow a lot, just two or three plants.  Last year, we had a bumper crop so I made several tubs of tomato sauce and shoved them in the freezer.  We used one tub last weekend over pasta, and it was lush!  It was so tasty that I immediately started planning to make pizza for dinner on Friday night.  Since my pizza recipe is straightforward, I thought I’d share it with you.

At it’s most basic, this recipe produces two “Neapolitan Pizzas” of dough + sauce + mozzarella for £1.80 and feeds 4.  It takes 3 hours.

Start with the dough.  This comes from an edition of Self magazine, that I purchased in (probably) 1992.   It is so simple that it didn’t take me long to internalise the recipe.  I have made this hundreds of times.   Please read the notes at the bottom before proceeding.

Pizza Dough - makes 2, 12-inch pizzas (approximate cost 20p)

Ingredients

2.5 cups of flour (yes, two and a half measuring cups)
1 cup tap water
1 sachet or two teaspoons of easy bake yeast
1 teaspoon olive oil (can be left out)
2 pizza trays (or see note 5 below)

Method

  1. Hand method:  Take off your rings.  Place your flour into a large bowl.  Scatter over the yeast, then make a well in the centre and pour in the water.  Coat your hands with the olive oil, allowing the excess to drip into the mixture.  Using your fingers, fold the flour into the water.  Continue until you have a smooth dough.
  2. Food processor method:  combine all the ingredients in the bowl of the food processor and process until a ball of dough is formed.  Turn the dough out into a large bowl.
  3. Both methods:  if the dough is too sticky at this point, kneed in a little extra flour.  If too dry, kneed in a tablespoon or two more water.
  4. Drape a clean tea towel over the bowl, and place it somewhere warm to rise for an hour.  While waiting, make your tomato sauce.
  5. Take off your rings.  Using your hands, knock back the dough.  (Give it a good thump, then kneed for a minute or two.). Cover and leave in a warm place for another hour.
  6. Knock back your dough again then divide it into two halves.  Form each half into a ball. 
  7. Scatter flour over your work surface and rub into your rolling pin.  Place the first ball of dough into the centre of your work surface and roll it out until it is a) circular, and b) fits your pizza tray.  Carefully lift it onto your pizza tray.  Repeat with the other ball.
  8. At this point, put your oven on to preheat at 240C.  Allow the dough to rise for a further 20 minutes, before covering with toppings.  Meanwhile, prepare your toppings.
  9.  Top your pizzas and bake at 240C for 10-12 minutes.  Serve.

Notes:-

  1. You might have noticed, that I keep telling you to take off your rings.  Yeast dough can be incredibly sticky and hard to remove from your hands.  You don’t want it caught up in your rings.  If you do get coated in dough, soak your hands in water and wash well until the damn stuff comes off.  Don’t be tempted to wipe if off on a towel, because it’ll harden to cement.  (I learnt this the hard way.)
  2. To help stop the dough sticking to you hands, drizzle a small amount of olive oil into the palm of one hand and rub over both palms and your fingers.  They will be greasy.
  3. Only baking for one or two?  The dough freezes well.  At the end of step 6, lightly grease the inside of a freezer bag, drop in one of the balls of dough and freeze.  Remember to label the bag first.
  4. No rolling pin?  Use an empty wine bottle or any similar shaped, tall, round, glass bottle.  Remove the label first.
  5. No pizza tray?  Or only one?  You could use a flat cookie tray and form a lip around the edge of your pizza, to keep the toppings inside.  Alternatively, if you only have one tray, you could leave the second half to rise again as a ball of dough, while the first one is cooking, but that will mean a two-part meal.
Now for the sauce.  This is based on one from Delia Smith (aka St Delia of the Kitchen) but it’s not in the book that I thought it came from.  The flour is to stop it separating and to help thicken it.  (Tomato sauces have a tendency to separate and split.). It freezes well.

Tomato Sauce (approximate cost 65p)

Ingredients

1 onion, finely chopped (10p)
1-2 cloves garlic, crushed (5p)
2x400g cans chopped tomatoes (or the equivalent of home grown). (50p)
1 heaped teaspoon of flour
1 teaspoon dried basil
I-2 teaspoons muscovardo sugar
Possible splash lemon juice or vinegar
1 tablespoon oil

Method

  1. In a decent sized saucepan, heat the oil over a low heat and gently fry the onion until it turns clear and glassy.  Stir in the garlic and fry for a minute or two longer.
  2. Scatter over the flour.  Stir well to ensure everything is covered.
  3. Pour in both tins of tomatoes, stirring continuously and bring to the boil. Turn down to a simmer and stir in the basil and one teaspoon of sugar.  
  4. Simmer until very thick. (This may take 20-30 minutes.) 
  5. Taste the sauce.  Is it too sweet?  Or too sour?  If too sweet, stir in a splash of lemon juice (from a bottle).  If too sour, stir in the second teaspoon of sugar.
  6. Allow to cool before spreading thinly on your pizza base.
Note: you may have sauce left over.  Don’t be tempted to pour it onto the pizzas - it will make for a watery, soggy pizza and your toppings will slide off.


Suggested Toppings

Scatter any combination of the following over your pizza:-

2 x Mozzarella balls, grated  (90p)
100g cheddar, grated (34p) - add to the mozzarella
1 can anchovies, drained (70p)
Sliced pepperoni or salami or chorizo or ham
Thinly sliced mushrooms and/or peppers
Thinly sliced olives
Leftover oven roasted sliced veg (peppers, mushrooms, onions)

Once, baked, the results should look like this.  


Yum!!

- Pam

Tuesday, 18 April 2017

Recipe Tuesday: Bread and Cheese Pudding

One of the websites I frequent is MoneySavingExpert.  A couple of weeks ago, their weekly newsletter had a give-away/competition:  win a copy of somebody's new cookbook full of £1 meals.  Sounds great!  Just the sort of cookbook that I'd enjoy reading and stealing ideas from.  Until I read the small print on the blurb at the back of the book....  Each portion of food costs £1.  Then I saw red.

Let me spell it out to you.  Since your average recipe makes four portions of a meal, that means each recipe actually cost £4.  Not £1.

It was a book of £4 dinners, not £1 dinners.  On the basis of this book, any fool can make a beef chilli, using supermarket standard ingredients and have spent less than £1 per portion.  Hell, I can do it using beef from my (expensive) Kosher butcher and have cash left over.  Talk about misleading marketing!  Some poor person, who is struggling to make ends meet, will buy that book based on the title and the fact that it was mentioned in MSE's newsletter.  Instead of getting something that will actually help them save money, they'll just get a cookbook full of all the recipes that don't involve roast dinners.

So in the spirt of "beat them at their own game", I have decided to publish a series of very cheap-to-cook recipes, tagging them as <£2dinners.   Here is the first.  The cost of each item is in brackets after its listing. All items are supermarket cheapest, "value" own-brand.

Bread and Cheese Pudding.

Serves 4.  Total cost £1.89

Ingredients

Four slices of bread, cut in half diagonally (5p)
325g can sweet corn kernels, drained (35p)
200g can tuna, drained (65p)
2 eggs (12p each = 24p)
250ml milk (25p)
75g mature cheddar cheese, grated (35p)

Method

  1. Preheat oven to 200C.
  2. Layer the bread, tuna and sweet corn  in a lasagne dish, so that the bread points stick up and each slice of bread has some tuna and corn between it and the next one.
  3. Scatter over the grated cheese.
  4. In a measuring jug, combine the eggs and the milk and whisk until well combined.  Add a grind or two of black pepper.
  5. Pour the egg mixture over the bread.
  6. Bake for 30-40 minutes, or until the cheese is melted and the egg mixture has set.

Yummy!


(As an aside, Blogger's reluctance to update their App is really beginning to wind me up.   I'm writing this on my iPad, via the web browser.  Uploading the photo for today's post was a nightmare.)

Tuesday, 28 February 2012

A very un-Kosher pasta dish

Sometimes, a recipe comes from almost nowhere.  That's what happened with this.  A chance glance at a photograph on the BBC Good Food website, led to me dreaming up this recipe on my drive home from work a couple of weeks ago.  It was so visceral, I could almost taste it.  In the end, I gave into my cravings, dug out the non-kosher cookware and came up with this:

Bacon and cream cheese pasta

Serves 4 to 6

Ingredients

150g bacon trimmings

1 onion sliced
1 clove garlic, crushed
100g mushrooms, sliced
250ml dry white wine
200g cream cheese
30g or so of freshly grated Parmigiano-Reggiano cheese (real "parmesan" not that Danish fake rubbish)
500g pasta shapes (I used quills because that is what I had)

Method

  • Put the water on to boil for the pasta.  Cook the pasta according to the packet's directions.
  • Meanwhile, prepare the onion, garlic and mushrooms and proceed with the rest of the recipe.
  • In a non-stick frying pan, dry fry the bacon until the fat begins to run.  Stir occasionally.
  • Once there is fat in the frying pan, add the onion and continue frying it until the onion becomes glassy/clear.
  
  • Stir in the mushrooms and the garlic.  Continue frying, stirring occasionally, until the mushrooms have made water and it has evaporated.
  • Pour in the white wine and bring to the boil.  Stir in the cream cheese and keep stirring until it has melted and the sauce is creamy.  Switch off the heat and stir in the parmesan.
 
  • Drain the pasta and return it to the saucepan.  Pour over the sauce.  Season with freshly ground pepper and serve.
  
 
Enjoy.
 
- Pam

Tuesday, 7 July 2009

Pizza!

A couple of weeks ago, we scored 6 x 100g balls of organic buffalo mozzarella cheese for 70p a ball, approximately half price. My first thought was "pizza!" followed by "lasagna". Four of the balls went straight into the freezer. The other two languished in the fridge until the Friday, when I made my first pizza for nearly 6 years.

That's right. I haven't made a pizza since we moved into this house, mainly because my gas-hob-electric-ovens stove isn't wired in. Our only working oven is a combination microwave-convection oven and I'd never considered it as a pizza oven. With DH's encouragement, though, I thought I'd have a go. After all, what's the worst that could happen? We could always phone out for a takeaway.

Turns out, the dough recipe is engraved on my brain (just as well - I don't have the magazine I got it from). So was the tomato sauce recipe. Even more surprising, the ancient freeze-dried instant yeast still worked (use by date October 2001).

Notes

Make the tomato sauce while the pizza dough is rising. It needs to be cool before you dress the pizza.

Pizza Dough Recipe (makes sufficient for two pizzas)

Ingredients

2.5 cups strong flour (I used wholemeal)
1 cup of tap water
1 sachet instant yeast
Pinch of salt
Olive oil

Method

  1. In a food processor, combine the flour, the salt and the yeast granules.
  2. Through the feeding tube, gradually add the water until the dough forms a ball. Note: you may not need all the water - it depends on the ambient humidity.
  3. Flour a pastry board or the kitchen worktop. Turn the dough out onto the board and knead by hand for a minute or so.
  4. Oil a large bowl. You can use spray oil or pour in a teaspoon or so of oil and swish it round.
  5. Place the dough in the bowl, turning it over until it is covered in oil (this stops it getting hard on top). Cover with a tea-towel and place somewhere warm and draft free to rise.
  6. When the dough has doubled in size (in approximately an hour), "knock it back": punch the middle of the dough to release the accumulated gasses and knead it for a minute.
  7. Cover again with the tea-towel and set the dough aside for its second rising.
  8. Repeat step 6. This time, though, after kneading the dough divide it into two and form into balls. If you are only making one pizza, pop the second ball into an oiled plastic bag and freeze.
  9. Flour your pastry board again and a rolling pin. Roll out the dough until it fits your designated pizza dish (I used to use a rectangular cookie sheet with a small lip, now I have a round one). Gently ease the dough into the pizza dish and leave it to rise for 20 minutes or so.
The dough freezes well. Defrost it in the fridge, then follow step 9 above.


Pizza sauce (makes enough for two pizzas)

Ingredients

1 tablespoon olive oil
1 large onion, finally chopped
2-3 cloves of garlic, crushed
2 x 400g/14 oz cans of chopped tomatoes
1 bay leaf
2-3 black peppercorns
1/2 teaspoon of sugar
1/2 teaspoon dried basil
1 tablespoon tomato puree/paste

Method

  1. Heat the oil in a large saucepan. Gently fry the onion and garlic until the onion is transparent but not coloured.
  2. Add the remaining ingredients. Bring to the boil and simmer for at least half an hour or until thick.
  3. Remove the bay leaf, switch off the hob and allow the sauce to cool.
  4. If the sauce is too chunky for your liking, liquidize it to suit.
The sauce freezes well and can be used for pasta.

Assembling the Pizza

While the dough is rising in the pizza dish, prepare your other ingredients. We usually use a drained can of tuna, some salted anchovy fillets, sliced peppers and an equal mix of grated cheddar and shredded mozzarella cheeses.

If you like mushrooms on your pizza, you'll need to prepare them a day or two in advance. Slice the mushrooms thinly and let them dry out as much as possible, otherwise your pizza will drown in the liquid they release.

Preheat the oven to 250C.

Thinly spread the pizza sauce on the freshly risen dough in the pizza dish. Layer over your other ingredients.

Place the pizza on the top shelf in the hot oven and bake for 12 to 15 minutes or until cooked.


Serve. Yum!

- Pam

Thursday, 5 July 2007

Cheese Pudding

I’ve got two egg yolks in the fridge and not enough motivation to want to spend much time in the kitchen tonight, so this is what I plan to make for dinner. (Now to find out that DH is reading this by whatever comments he makes via email.)

This is a savoury version of Bread and Butter Pudding; to accompany it, I’d serve a green vegetable like broccoli and, maybe, some oven roasted cherry tomatoes (put the tomatoes in when there is only 30 minutes of cooking time remaining). The recipe serves 4. If you omit the butter and use skimmed milk, it is 4 WW points a serving. Use 4 egg-whites instead of whole eggs and it is 3.5 WW points a serving.

You can, of course, omit the tuna if you don't like it.

Ingredients

Wholemeal Bread - 4 slices
Butter 1 tablespoon
50g Cheddar Cheese grated
Sweetcorn - 1 cup
1 can Tuna in brine drained & flaked
Eggs - 2
milk - 1/2 pint
3 or 4 grinds of pepper

Method

1) Butter the bread and cut on the diagonal. Arrange the slices in a lasagne dish (approximately 5 x 8 x 2.5 inches or 12 x 20 x 7 cm in size).


2) Flake over the tuna. Making sure that some gets between the slices. Repeat with the sweetcorn and the grated cheese.

3) Beat together the milk and the egg until well blended. Grind over some pepper. Pour the egg mixture slowly and evenly over the bread mixture.

4) Allow the pudding to rest for approximately 10 minutes. I use this time to preheat the oven to 180 C – when it reaches full temperature, the resting time should be over.

5) Bake for approximately 45 minutes or until golden and set.

6) Remove from the oven and allow to rest for 5 minutes before serving.

- Pam

Tuesday, 12 June 2007

Cauliflower & Pea Terrine


Today’s recipe is perfect for a cold starter for a dinner party or for the main course on a hot summer day. If you are tempted to serve it hot, good luck – the only time I’ve turned it out hot, it collapsed and started slithering down the side of the kitchen cabinet! That version only had one egg, so next time I made it I doubled the quantity of eggs.

This is perfect if you aren't that keen on vegetables but want to ensure you get your five servings of veggies a day. The cheese tones down the sulpherous taste of the cauliflower - not my favourite vegetable. I've yet to meet someone who doesn't like peas. Don’t know what to do with the other half of the cauliflower? Make Aloo Gobi (recipe next week).

The original version of this recipe is in Rose Elliott’s Cheap & Easy Vegetarian Cookbook. I think hers uses more cheese, too. The method below is all mine.

This recipe serves 4 as a main course, 8 as a starter. A main course serving costs 2.7WW points.

If you want to try a different version, I'd suggest broccoli instead of cauliflower, coupled with sweetcorn. Drop the mint and put the cheese with the corn, not the broccoli. The points would remain the same.

Ingredients

40g/1oz Butter
50g/1.5oz strong Cheddar Cheese grated
125g/4.5oz Green Peas (frozen is fine)
30g/1oz flour
2 Eggs
300ml/½ pint milk (skimmed if doing WW)
1/2 cauliflower
1/4 teaspoon dried mint

Method

1) Preheat oven to 180 C

2) Line a loaf pan with non-stick silcon paper/greaseproof paper

3) Break the cauliflower into florets, place in a saucepan, cover with water, bring to boil and simmer for 5 minutes

4) Meanwhile cook the peas in boiling water for 5 minutes.

5) In a saucepan, melt the butter over a low heat. Remove from heat. Wisk in the flour and blend until smooth, forming a roux. Return to heat, stiring all the time. When the roux is foaming, gradually stir in the milk and wisk until smooth. Bring sauce to boil, stiring constantly. Once boiled, simmer for 10 minutes, stiring ocasionally. (Sauce very thick).

6) When vegetables are cooked, drain them carefully.

7) In a blender/liquidizer/food processor, combine half the sauce with the drained cauliflower, all the cheese, and one egg. Blend until smooth. Pour into the lined loaf pan and smooth out until even.

8) In the blender again, combine the peas, mint, the other egg and the other half of the sauce. Blend until smooth. Pour over the cauliflower mixture and smooth out the top.
9) Bake at 180 C for at least an hour, until firm. Allow to cool in tin before turning out. Serve cold.

- Pam